
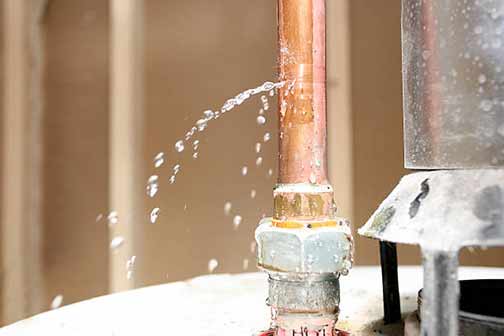
Understanding the Immediate Risks of a Pipe Leak
When faced with an emergency pipe leak, it is critical to quickly recognize the potential risks associated with the situation. A pipe leak can cause severe water damage, lead to mold growth, compromise electrical systems, and result in excessive water bills. Understanding these risks can help you prioritize the steps needed to address the issue efficiently.
Gathering Essential Tools and Materials
Before you can take effective steps to fix an emergency pipe leak, it’s essential to gather the right tools and materials. These may include pipe repair clamps, rubber moisture seals, pipe cutters, plumber’s tape, pipe wrenches, and a bucket or container to catch water. Having these items on hand can save precious time and make the repair process smoother and more efficient.
Turning Off the Main Water Supply
One of the first actions you should take when dealing with an emergency pipe leak is to turn off the main water supply. This will prevent further water from flowing through the affected pipe and reduce the risk of additional damage. The main water shut-off valve is usually located near the water meter or where the main water line enters your home. Turn it off completely to halt the water supply.
Draining the Remaining Water in the Pipes
After shutting off the main water supply, it’s important to drain the remaining water in the pipes. You can do this by opening the faucets connected to the leaking pipe and allowing the water to flow out. This step is essential to minimize water pressure and make it safer and easier to work on the pipe repair.
Locating the Exact Source of the Leak
To effectively fix an emergency pipe leak, you first need to locate the exact source of the leak. This may require removing any insulation, coverings, or obstacles that obstruct your view of the pipe. Look for visible signs of water leakage, such as drips, stains, or puddles, to pinpoint the affected area.
Temporary Fixes to Contain the Leak
In some cases, you may need to apply temporary fixes to contain the leak until a permanent repair can be made. Use pipe repair clamps or rubber moisture seals to secure the leak temporarily. Wrapping the area with plumber’s tape can also provide a short-term solution to control the water flow.
Cutting and Removing the Damaged Pipe Section
For a permanent repair, you may need to cut and remove the damaged section of the pipe. Use a pipe cutter to carefully cut around the affected area. Make sure to measure and mark the section that needs to be removed to ensure an accurate cut. Use a bucket or container to catch any residual water that may trickle out during this process.
Preparing the Replacement Pipe
Once you’ve removed the damaged section, prepare the replacement pipe. Measure the length of the section you’ve cut out and cut a new piece of pipe to match that length. Smooth the edges of the new pipe with a deburring tool to ensure a secure fit when you connect it to the existing pipe.
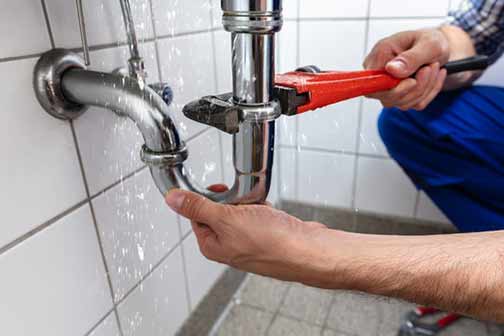
Connecting the Replacement Pipe
To connect the replacement pipe to the existing pipe, you’ll need to use appropriate fittings, such as couplings or connectors. Apply plumber’s tape to the threads of the connectors to create a watertight seal. Position the new pipe in place and use a pipe wrench to tighten the connections securely.
Checking for Leaks
After completing the connection, it’s essential to check for any remaining leaks. Turn the main water supply back on and observe the repaired section closely. Look for any signs of water seepage or drips, and tighten the connections further if necessary. If no leaks are detected, you can proceed with the final steps of the repair process.
Insulating and Protecting the Repaired Pipe
To prevent future leaks and protect the repaired pipe, consider insulating it. Use pipe insulation sleeves or wrap the pipe with insulation material to safeguard it from temperature fluctuations, which can cause pipe expansion and contraction. Proper insulation can also prevent freezing during colder months.
Monitoring for Recurrence
Even after the repair is complete, it’s important to continue monitoring the area for any signs of recurrence. Regularly inspect the pipe and surrounding area for evidence of leaks or moisture buildup. Address any issues promptly to prevent major damage and ensure the longevity of your repair work.
When to Call a Professional Plumber
While many emergency pipe leaks can be addressed with DIY methods, some situations may require the expertise of a professional plumber. If the leak is extensive, originates from hard-to-reach areas, or involves complex plumbing systems, it’s best to seek professional assistance. A licensed plumber can provide a thorough assessment and implement long-term solutions to prevent future leaks.
Preventative Measures to Avoid Future Leaks
Finally, taking preventative measures can help you avoid future pipe leaks. Regularly inspect your plumbing system for signs of wear and tear, such as corrosion, rust, or joint weaknesses. Consider installing leak detection systems that alert you to potential issues before they become major problems. Additionally, maintain proper water pressure and avoid disposing of inappropriate materials down the drain to keep your pipes in optimal condition.
Conclusion
Effectively managing and repairing emergency burst pipe leaks requires a clear understanding of the steps involved and the tools necessary for the job. By following these guidelines and being proactive in maintaining your plumbing system, you can minimize damage, ensure the longevity of your pipes, and address leaks promptly and efficiently.