
What Is a French Drain and Why Does It Matter?
A French drain is one of the most effective solutions for managing water that collects where it shouldn’t — alongside a foundation, in a low corner of the yard, or anywhere groundwater pools after rain and doesn’t move. Left unaddressed, that standing water works its way into basements, saturates soil against foundation walls, and over time contributes to cracking, settling, and erosion that’s expensive to reverse.
The concept is straightforward: a gravel-filled trench with a perforated pipe at the bottom intercepts water moving through the soil and redirects it away from the problem area before it can accumulate. It works with the natural movement of groundwater rather than fighting it, which is why it’s been a reliable drainage solution for well over a century.
For homeowners dealing with recurring wet basements, soggy yards, or water that consistently runs toward the house after heavy rain, understanding how French drains work — and whether one is the right fix for your specific drainage problem — is a practical starting point.
How a French Drain Works
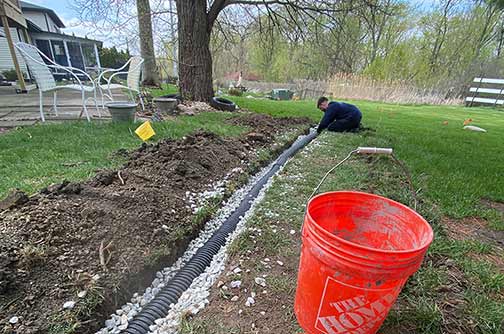
The mechanics are simple. A trench is dug along the path water naturally travels or collects, lined with landscape fabric to keep soil from migrating in, and filled with crushed stone or gravel. A perforated pipe runs along the bottom of that gravel bed. As water moves through the soil and into the trench, it passes through the gravel and enters the pipe through the perforations, then flows along the pipe to a designated discharge point — a storm drain, dry well, or a lower area of the property where water can disperse safely.
The whole system runs on gravity. There are no pumps, no mechanical parts, and no electricity involved. The pipe needs to maintain a consistent downward slope from the collection point to the discharge point — typically around one inch of drop for every eight to ten feet of run — to keep water moving rather than sitting. Get the slope right and the system works quietly in the background for years with minimal attention. Get it wrong and water stalls in the pipe, defeating the purpose entirely.
That slope calculation is the most critical part of a French drain installation, and the most common place DIY installations go wrong.
Key Components of a French Drain System
Every French drain has the same core components, and each one has a specific job. Getting any of them wrong affects how well the system works and how long it lasts.
The trench is the starting point — typically six inches wide and eighteen to twenty-four inches deep, though the right dimensions depend on the volume of water the system needs to handle and the soil conditions on the property. A trench that’s too shallow won’t intercept groundwater moving below the surface; one that’s too narrow restricts flow.
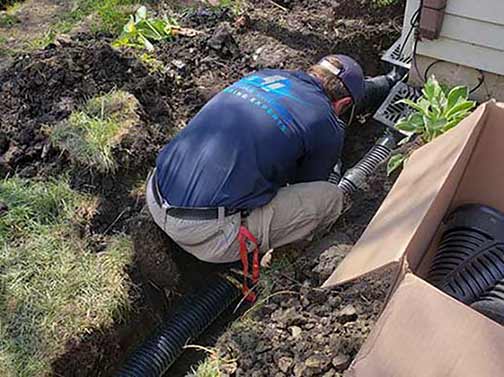
The perforated pipe — usually PVC or corrugated plastic — runs along the bottom of the trench and carries collected water to the discharge point. PVC holds its shape better over time and is less prone to crushing under soil pressure, making it the more durable choice for permanent installations.
Crushed stone or gravel surrounds the pipe and fills the trench. It creates the permeable bed that allows water to move freely toward the pipe while supporting the trench walls. The size of the gravel matters — material that’s too fine clogs over time, while coarser crushed stone maintains flow.
Geotextile landscape fabric wraps the entire gravel bed, separating it from the surrounding soil. This is what keeps the system from silting up over time. Without it, fine soil particles migrate into the gravel, reduce permeability, and eventually choke the system entirely — often within a few years in clay-heavy soils.
The trench is finished with topsoil and grass or another surface material that blends with the surrounding landscape and protects the components underneath.
Planning Your French Drain: What to Figure Out Before You Dig
The most important work in a French drain installation happens before any digging starts. A system that’s placed in the wrong location, drains to the wrong discharge point, or isn’t sized for the volume of water it needs to handle will underperform or fail regardless of how well it’s built.
Start by observing where water actually goes on your property during and after heavy rain. Where does it pool? Where does it run? Where is it coming from — surface runoff, groundwater rising from below, or water draining off an adjacent property or structure? The answer changes where the drain needs to go and how deep it needs to be. A drain intercepting surface runoff sits differently than one managing a high water table.
Soil type matters more than most homeowners realize. Sandy soil drains freely and a French drain in sandy conditions works almost immediately. Clay soil is dense and slow-draining, which means water moves toward the pipe more slowly and the system needs to be sized accordingly — a drain that works fine in sandy soil may be undersized for the same water volume in clay.
Discharge point selection is where DIY installations most commonly create new problems. The outlet needs to direct water to a location where it can disperse without pooling against a neighbor’s foundation, saturating someone else’s yard, or running back toward the house. A storm drain connection, a dry well, or a slope that carries water to the street or a low point of the property away from all structures are the standard options.
If the drainage situation is complex — water coming from multiple directions, a high water table, or a tight property with limited discharge options — a drainage contractor or plumber with flood control experience is worth consulting before committing to a layout.
How to Install a French Drain: Step by Step
1. Mark the trench route Walk the path the drain will follow and mark it with spray paint or stakes and string. The route should follow the natural path water travels or intercept it before it reaches the problem area. Confirm the discharge point is accessible and appropriate before committing to the layout.
2. Establish and verify slope The trench needs a consistent downward slope from the collection end to the discharge point — at least a one percent grade, which works out to roughly one inch of drop for every eight feet of run. Use a line level or laser level along the string line to verify the slope before digging. Eyeballing it is how systems end up with flat sections where water sits instead of flows.
3. Excavate the trench Dig to the planned dimensions — typically six inches wide and eighteen to twenty-four inches deep. Keep the walls as straight and consistent as possible. In clay soil, the trench walls can collapse if left open too long, so plan to line and fill the same day if conditions are unstable.
4. Line with landscape fabric Lay geotextile fabric into the trench, pressing it into the corners and letting the excess drape over both sides. Leave enough overlap on each side to fold back over the gravel once the trench is filled. The fabric goes in before the gravel — not on top of it at the end.
5. Add a gravel base and set the pipe Pour a two to three inch layer of crushed stone into the bottom of the fabric-lined trench. Set the perforated pipe on top with the perforations facing down — this allows water to enter from below where it collects rather than from above where debris can clog the holes. Confirm the slope is maintained along the pipe before backfilling.
6. Backfill with gravel Fill the trench with crushed stone to within three to four inches of the surface, fully surrounding and covering the pipe. Compact lightly as you go to eliminate air pockets without crushing the pipe.
7. Fold and close the fabric Fold the excess landscape fabric over the top of the gravel, overlapping in the center. This creates a complete envelope around the gravel bed that keeps soil from migrating in from any direction.
8. Finish the surface Cover the folded fabric with two to three inches of topsoil and restore the surface with sod, seed, or whatever ground cover matches the surrounding landscape. Grade the surface so it slopes away from the house and doesn’t create a low spot directly over the trench.
Common French Drain Problems and How to Fix Them
The drain has stopped working or is working slowly The most common cause is siltation — fine soil particles have migrated through or around the landscape fabric into the gravel bed and pipe over time, reducing permeability. This happens gradually and is most common in clay-heavy soils where the fabric wasn’t lapped and sealed properly during installation. Flushing the pipe with a garden hose clears minor buildup. More significant clogging requires either hydro jetting the pipe or, in severe cases, excavating and relining the system with fresh gravel and fabric.
Root intrusion is the other frequent cause. Tree and shrub roots follow moisture into the gravel bed and eventually into the perforated pipe itself. If flushing doesn’t restore flow, a camera inspection of the pipe will show whether roots are the problem.
Water is pooling in the same spot it always did This usually means the slope is insufficient — there’s a flat or reverse-sloped section somewhere in the run where water stalls instead of continuing toward the discharge point. The only fix is re-excavating the problem section and correcting the grade. Catching this during installation with a level is far easier than diagnosing it after the trench is backfilled.
The system handles normal rain but backs up in heavy storms The drain is undersized for peak water volume. A pipe diameter or gravel bed that works fine for moderate rainfall can’t move water fast enough when a significant storm hits. Adding a secondary drain run parallel to the first or upsizing the pipe at the collection end addresses the capacity problem.
What to watch for after heavy rain Walk the drain route after a significant storm and look for water surfacing through the ground above the trench, pooling near the collection point, or not discharging at the outlet. Any of these indicates the system isn’t keeping up and warrants a closer look before the problem develops further.
How to Maintain a French Drain
French drains are low maintenance by design, but low maintenance doesn’t mean no maintenance. A system that gets checked periodically will last decades. One that gets ignored until something goes wrong is often more expensive to restore than it would have been to maintain.
After every significant storm Walk the drain route and check the discharge point. Water should be flowing or showing signs of recent flow at the outlet. If the ground above the trench is saturated, water is surfacing through the soil, or the discharge point is dry despite heavy rain, something in the system isn’t moving water the way it should.
Once or twice a year Clear any surface debris — leaves, soil buildup, grass overgrowth — from the inlet area and around the discharge point. A blocked outlet is one of the simplest problems to fix and one of the most common reasons systems appear to fail when they’re otherwise functioning correctly. If the system includes a catch basin, remove the grate and clear any accumulated sediment from the basin floor.
Every few years Flush the perforated pipe with a garden hose from the inlet end and confirm water flows freely to the discharge point. If flow is sluggish or blocked, hydro jetting the pipe is the most effective way to clear accumulated silt and minor root intrusion without excavating. If the system isn’t responding to flushing and the problem has been developing for a while, a camera inspection will show what’s inside the pipe and whether the gravel bed needs to be partially replaced.
Watch for ground settlement Soil settling or sinking along the trench line can indicate the gravel bed has compacted or shifted, which affects both the slope of the pipe and the permeability of the system. Minor surface settling is normal in the first season after installation. Ongoing or significant movement warrants a closer look.
How to Incorporate a French Drain Into Your Landscape
A French drain doesn’t have to look like a utility installation. With some thought about materials and placement, it can blend into the yard naturally or become a deliberate design element.
The simplest approach is finishing the trench surface with decorative gravel or river rock that matches the surrounding landscape. This keeps the inlet area visible and accessible for maintenance while looking intentional rather than functional. Alternatively, the trench can be turfed over completely with sod or ground cover — moisture-tolerant plants like creeping jenny, hostas, or ornamental grasses work well directly above or alongside a drain line and can actually benefit from the consistent moisture the system manages.
Placement can do design work too. A drain running along the edge of a garden bed creates a natural border. One running alongside a walkway defines the path while solving a drainage problem at the same time. A dry creek bed — a decorative channel filled with river rock that conceals the drain — is one of the more visually effective ways to handle surface water while adding a landscape feature that looks like it belongs there.
The one constraint worth keeping in mind: whatever surface treatment you choose, the inlet area and discharge point need to stay accessible. A drain that’s been landscaped into invisibility is harder to inspect and maintain when something eventually needs attention.
Permits and Legal Considerations Before You Install
Most municipalities require a permit for drainage work that alters how water moves on or off a property. This includes French drain installations that discharge to a storm sewer, a public right-of-way, or anywhere that directs water toward neighboring properties. Installing without the required permits can result in fines, a requirement to remove or modify the system, and liability if the discharge causes water damage to an adjacent property.
Before starting, contact your local building or public works department to find out what’s required in your area. The questions worth asking are straightforward: does this project require a permit, where can the system legally discharge, and are there any setback requirements from property lines, septic systems, or protected areas?
Discharge design is where most legal and environmental problems originate. Water that drains efficiently away from your foundation but pools against a neighbor’s foundation, saturates a septic field, or flows into a protected wetland creates new problems in the process of solving the original one. The discharge point needs to be verified — not just assumed — to be directing water somewhere appropriate before installation begins.
If the drainage situation involves shared property lines, easements, or any uncertainty about where water will end up, a drainage contractor or municipal engineer is worth consulting before committing to a design.
A French Drain Is Only as Good as Its Installation
A well-designed and correctly installed French drain is one of the more durable solutions in residential drainage — low maintenance, no moving parts, and effective for decades when the slope is right, the components are correct, and the discharge point actually takes water somewhere it can go.
The problems almost always trace back to installation shortcuts: insufficient slope, wrong gravel size, fabric that wasn’t lapped properly, or a discharge point that was chosen for convenience rather than verified to work. None of those are complicated to get right the first time. They’re just harder and more expensive to fix after the trench is backfilled and the yard is restored.
If the drainage situation on your property is straightforward — a defined low spot, a clear path to a logical discharge point, manageable soil conditions — a French drain is a reasonable DIY project for someone comfortable with the work. If it involves a high-water table, clay soil, complex grading, or water coming from multiple directions, the design decisions are worth running past a drainage contractor or experienced plumber before you dig.