
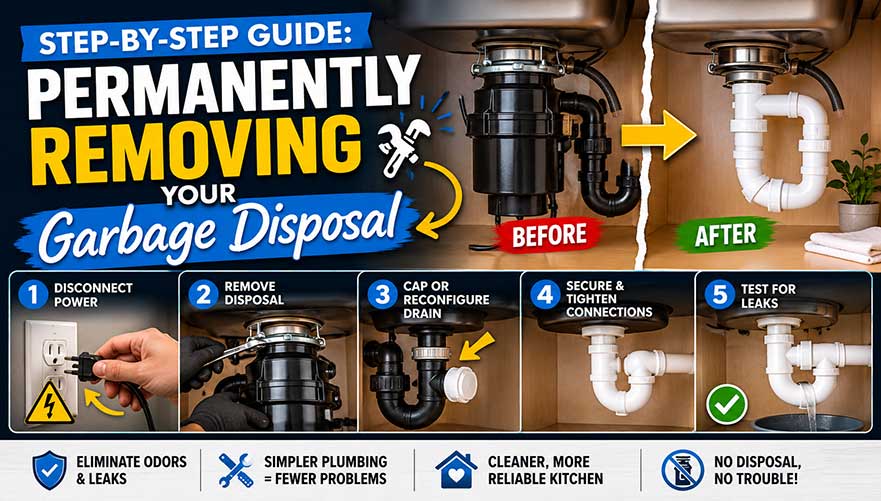
The Step Almost Every Guide Skips: What Happens to the Pipe Where the Disposal Used to Be
Removing a garbage disposal is a genuinely manageable DIY project, most of it is unplugging, unscrewing, and swapping one drain fitting for another. Where people run into trouble isn’t usually the removal itself, it’s what goes back in its place, especially if you have a double-bowl sink or a dishwasher that was draining through the disposal. This guide walks through the full process in order, including the two steps most guides leave out entirely.
Why Homeowners Remove a Disposal Permanently
A few reasons come up most often: a septic system, since disposals add solid food waste to a tank that generally needs more frequent pumping as a result; a unit that’s broken and not worth replacing; or simply a preference for less to maintain under the sink. None of these change the mechanics of the removal itself, but it’s worth being clear on your own reason, since it affects what you replace the disposal with, a simple drain flange for most homes, or a specific septic-friendly configuration if that’s your situation.
Safety Precautions
- Turn off power to the disposal at the circuit breaker, not just at a wall switch, before touching any wiring.
- Wear gloves and eye protection. The underside of a disposal often has sharp edges, and old plumbing connections can release more water or debris than expected.
- Have a flashlight ready. The space under a sink is rarely well lit.
- Keep a bucket and towels within reach; water will spill when you disconnect the drain lines regardless of how carefully you drain the pipes first.
Materials Needed
- Adjustable wrench and pliers
- Pipe wrench
- Plumber’s putty
- Bucket and towels or rags
- Flashlight
- A sink strainer/drain flange kit sized to replace the disposal’s mounting assembly, this is the part most hardware stores sell specifically for this purpose, sometimes labeled a “disposal blank-off” or basic strainer kit
- Replacement tailpiece and slip-nut fittings to reconnect to your existing trap
- A basin wrench, optional, but useful if your mounting nuts are in a tight spot
Shutting Off Power and Water
- Turn off the breaker that powers the disposal. If you’re not sure which one it is, run the disposal briefly and watch for it to stop as you flip breakers, or check your panel’s labeling.
- Turn off the hot and cold shutoff valves under the sink. A disposal itself has no water supply connection, but you’ll want the sink’s water off before working underneath it.
- Run the faucet briefly to relieve pressure and drain what’s left in the lines above the trap.
Disconnecting the Garbage Disposal
- Place a bucket directly under the disposal and trap to catch standing water and debris.
- Check how the unit is wired before touching anything. Many residential disposals simply plug into an outlet inside the sink cabinet, in which case you just unplug it. If yours is hardwired instead, a direct wire connection under a small cover plate on the bottom of the unit, confirm the breaker is off, remove the cover plate, and disconnect the wire nuts, noting which wire went where.
- If a dishwasher drain hose connects to the side of the disposal, loosen its clamp and disconnect it now. You’ll need to reroute this in a later step, don’t skip noting that it was there.
- Loosen the mounting ring at the top of the disposal with a wrench, this is what holds the unit against the sink flange.
- Disconnect the drain line running from the disposal’s discharge outlet to the trap.
Removing the Unit
- Support the disposal with one hand while you release the mounting ring, it’s heavier than it looks and will drop suddenly once free.
- Twist and lower it out of the mounting assembly, then set it aside.
- If you suspect something valuable, a ring or other small item, may have gone down the drain before the disposal failed, check our guide on what to do if you flush jewelry down the drain before you dispose of the unit or the trap contents.
- Dispose of the old unit through your local appropriate recycling or disposal program rather than regular household trash, since it contains motor components and metal that most municipalities want handled separately.
The Part Most Guides Skip: Reconnecting the Drain Correctly
A disposal’s mounting assembly and outlet sit at a specific height and angle that a standard sink strainer doesn’t automatically match, and getting this wrong is exactly how you end up with a leak, or on a double-bowl sink, a backup that shows up on the wrong side entirely.
If you have a single-bowl sink
Remove the disposal’s mounting assembly from the underside of the sink and replace it with a standard sink strainer kit, following the kit’s instructions for the putty seal at the sink opening. Connect a straight tailpiece from the strainer down to your existing trap, trimming it to length if needed so the trap sits at the correct height and slope.
If you have a double-bowl sink
Double-bowl sinks typically join both basins into a single shared trap through a fitting called continuous waste, and a disposal changes where that connection sits. Once the disposal is gone, you’ll likely need a new continuous waste tee sized for two standard strainers instead of one strainer and one disposal outlet. Getting the slope and connection right here matters more than it might seem, an improperly sloped or mismatched continuous waste tee is a common, specific cause of one side of a double sink backing up into the other, which we cover in detail in our guide on why a double kitchen sink backs up to the other side.
If a dishwasher was draining through the disposal
This is the step that gets missed most often. If your dishwasher’s drain hose was connected to the disposal, it needs a new connection point once the disposal is gone, it can’t simply be left disconnected. A standard sink strainer kit doesn’t include a dishwasher inlet the way a disposal does, so you’ll need either a strainer/tailpiece combination with a dishwasher connection nipple, or a dedicated dishwasher air gap fitting mounted separately, depending on your setup. Reconnect the dishwasher drain hose to whichever fitting you install, and secure it with a proper hose clamp.
Testing for Leaks
- Turn the water supply back on and run the faucet for a few minutes.
- Check every connection you touched, the strainer seal, the tailpiece slip nuts, and the trap, for drips, tightening anything that’s not fully sealed.
- If a dishwasher was reconnected, run a short cycle and check its new connection point specifically, a slow drip there can go unnoticed for weeks since it’s often out of sight.
- Only once everything runs dry for several minutes under normal use should you consider the job finished.
Clean-Up
- Dispose of old fittings, packaging, and any debris from the trap.
- Wipe down the cabinet floor and walls under the sink, both from the project itself and any residue from the old disposal.
- Store leftover fittings and tools for future reference, it’s common to need a spare slip nut or washer down the road.
When to Stop and Call Us Instead
If you’ve got a double-bowl sink, a dishwasher connection to reroute, or you’re not confident about matching the new continuous waste slope to code, this is a project where a wrong connection causes a slow leak or a recurring backup that’s more annoying to diagnose later than it would have been to just get right the first time. Our kitchen plumbing services handle disposal removal and the drain reconfiguration behind it in one visit.
Frequently Asked Questions
Does a garbage disposal have a water supply line I need to disconnect?
No. A disposal connects to your drain and to power, either a plug or hardwired connection, but it has no water supply line of its own. You’ll still want the sink’s water shut off while you work underneath it, but there’s nothing to disconnect on the supply side of the disposal itself.
My disposal isn’t hardwired, it’s just plugged in. Is that normal?
Yes, it’s actually the more common setup in residential kitchens. If you see a cord running from the disposal to an outlet inside the cabinet, you can simply unplug it after confirming the breaker is off, rather than removing any cover plate or wiring.
What do I do with my dishwasher’s drain hose if it was connected to the disposal?
It needs to be rerouted to a new connection point, either a strainer and tailpiece combination with a dishwasher inlet, or a separate dishwasher air gap fitting, rather than left disconnected. Skipping this step is one of the most common reasons a dishwasher stops draining properly after a disposal removal.
Why does my double sink back up on the other side after I removed the disposal?
This usually means the new continuous waste connection isn’t sloped or sized correctly for two standard strainers now that the disposal’s outlet is gone. Our guide on double sink backups covers the mechanics of why this happens and how to fix it.
Can I just leave the disposal disconnected instead of removing it entirely?
You can, but an unused disposal left in place still occupies the drain connection and can eventually leak or corrode with age, so most homeowners who decide against using one choose to remove it and simplify the drain rather than leave dead weight under the sink indefinitely.
Getting the Drain Right Matters More Than Getting the Disposal Out
Taking the disposal out is the easy part. What actually determines whether this project goes smoothly is what you connect in its place, especially on a double-bowl sink or with a dishwasher in the mix. Get that part right and you’re done; get it wrong and you’ll be back under the sink within a month chasing a leak or a backup that traces right back to this project. If anything doesn’t look right along the way, call us at 708-801-6530 and we’re happy to walk through it with you or send someone out to finish it correctly.
—
Suburban Plumbing Sewer Line & Drain Cleaning Experts
Licensed & Insured | Serving Chicago & the Suburbs Since 1978